Sunday, February 6, 2011
Forum Set (no Scrapkit)
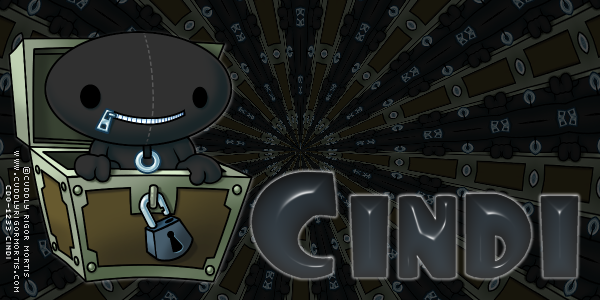
ok so I am feeling a little bit brave and decided to write a quick tutorial. I just made this forum set no scraps required. I did use EyeCandy 4000. You can get the same effects with your bevel and drop shadow but I don't know the settings sorry.
This set features CuddlyRigorMortis' amazing artwork you can get it HERE Please do not use the same artwork without proper license.
ok lets start... for this you should start by picking the tube you want to use. Now open a new image 600 wide by 300 high transparent. Copy and paste your tube on to your canvas. Now Effects; Reflection effects; Kaleidoscope until you like the way it looks.
Add a new rastor layer and floodfill with a dark color from your tube I used a gray change your blend mode to mutiply. Now add your tube and resize to your liking. Position to the left with a drop shadow of 1,1, 40, 4 color White. Add your © and merge your image. Now is a good time to save if you have not already. Then add your name using the same dark color as before with the foreground off. I used Foo size 100. convert to a rastor layer and then use Eye candy 4000 and the Graphite setting, then use eyecandy 4000 gradient glow 3,25,100 draw outside checked, on the color tab check Fat and then click the first little color selector box and change the color to your dark color. Save again you are done with the tag ;)
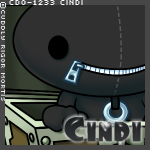
Now for the avi make a new image 150 by 150 transparent. Flood fill this with your dark color selections; select all, selections; invert, selections; modify; contract by 5 and delete. copy and paste your little avi frame on to the tag you just made. Move your little frame to an area of the tag you think would look good as an avi. Now take your magic wand with your little frame layer active click in the area OUTSIDE the box make your tag layer active and hit delete. add your © and then merge visible. copy this as a new image and repeat the adding of a name (making it smaller or just the first letter)save you are now done with your avi.
I like to save my avi and Tag together if I am keeping the template so I undo on the tag layer and take a copy of the avi and paste it as layer so I can save it all as one PSP file.
Thank you for trying my tut. I would love to see your results.
Please note this tutorial was written by me on the 6th Feb 2011, and any resemblance to any other tutorial is purely coincidental.
This set features CuddlyRigorMortis' amazing artwork you can get it HERE Please do not use the same artwork without proper license.
ok lets start... for this you should start by picking the tube you want to use. Now open a new image 600 wide by 300 high transparent. Copy and paste your tube on to your canvas. Now Effects; Reflection effects; Kaleidoscope until you like the way it looks.
Now for the avi make a new image 150 by 150 transparent. Flood fill this with your dark color selections; select all, selections; invert, selections; modify; contract by 5 and delete. copy and paste your little avi frame on to the tag you just made. Move your little frame to an area of the tag you think would look good as an avi. Now take your magic wand with your little frame layer active click in the area OUTSIDE the box make your tag layer active and hit delete. add your © and then merge visible. copy this as a new image and repeat the adding of a name (making it smaller or just the first letter)save you are now done with your avi.
I like to save my avi and Tag together if I am keeping the template so I undo on the tag layer and take a copy of the avi and paste it as layer so I can save it all as one PSP file.
Thank you for trying my tut. I would love to see your results.
Please note this tutorial was written by me on the 6th Feb 2011, and any resemblance to any other tutorial is purely coincidental.
Labels:
Avi,
Cuddly Rigor Mortis,
tags,
tutorial
Subscribe to:
Post Comments (Atom)
About Me

- Cindi
- I am married to my high school sweetheart. We have been together since 1994. We have one amazing little girl who makes everyday an adventure!
Labels
- Alika's Scraps (5)
- Ann (2)
- Avi (1)
- Black (7)
- Blue (4)
- Brown (3)
- Christmas (1)
- Creative Intentionz (1)
- Creatively Scrappin Blog Train (2)
- CU (2)
- Cuddly Rigor Mortis (1)
- Daniel Esparza (1)
- Dee'sSign Depot Dangerously Delicious Designz (1)
- Fabulous Art Beginnings (1)
- FallnAngel (2)
- Freebie (1)
- Gary Rudisill (1)
- Green (6)
- Jasmine Becket-Griffith (3)
- KT Bryan (1)
- Lady Mishka (1)
- Lollipops n Gumdrops (2)
- Myka Jelina (2)
- O'Scrap Candy Shack (1)
- Orange (2)
- Owl (1)
- Pink (8)
- Pinup Toons (2)
- Purple (3)
- Red (3)
- Sale (1)
- Steampunk (2)
- Suzanne Woolcott (1)
- tags (14)
- template (2)
- ThePSProject (1)
- tutorial (13)
- Weescotslass Creations (1)
- Wicked Princess (4)
- Zlata M (1)
Followers
T.O.U.
OK so for now I am going to keep it simple.
Please email me if you have any questions regarding usage which is not answered. Contact: iceholecyn@gmail.com
If you want a tag or stat I have displayed PLEASE contact me I save most of my templates.
If you want to share my work with your friends and family, send them a link to my blog so they can download for themselves.Just copy and paste my URL http://iceholecyn.blogspot.com/
You MAY NOT:* Claim my work as your own.* Alter any of my work and claim as your own original creation.* Upload my work to any website or file hosting site as downloads.
My CU items simply require a credit as a part of your kit. IF you are feeling generous you can send me a free copy of your kit :D
Thank you!
Cindi aka IceHoleCyn


2 comments:
WOOHOO!!!
AWESOME!!!
Cindi!! Those are Amazing!! ♥
Post a Comment