Sunday, May 8, 2011
Kiss This
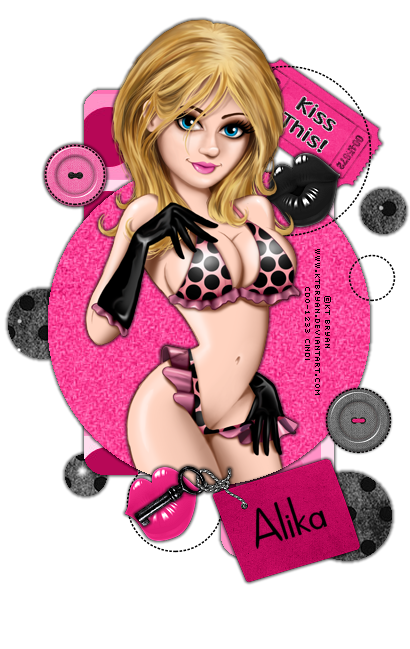
For this tag I used Paint Shop Pro 9 it should work with any version of the program.
You will need the “Kiss This” tagger scrap kit by Alika’s Designs. BabesDesignz_Template19.
You will also need a tube of choice I used beautiful artwork from KT Bryan. I also used eyecandy4000’s Gradient Glow (3, 45, 100, color black).
To start download the scrap kit unzip it, get your template unzip it and pick your tube.
Now open the template, Shift D to duplicate the template close the original. Save the duplicated template with whatever you want to call you tag.
We need to modify the template delete the “copyright” move the “2” layer above the “raster 1” layer. Image> rotate> rotate clockwise 90, flood fill your background with a really BRIGHT color (I like bright orange). We will delete this layer later but it is nice to be able to see the various elements we are adding.
Open as08 Copy and paste as a new layer just above your background. Image>rotate>free rotate> 90 degrees right. Make your background layer active selections>select all make the “as08’ layer active again selections> invert hit delete. Selections> select none.
Make 1 active selections>select all> selections float> selections defloat> selections modify expand by 1. Open “aspaper09” copy and paste as a new layer above 1 move the paper around until you like the placement of the dots, selections> invert hit delete. Selections> select none delete layer 1.
Make 3 active selections>select all> selections float> selections defloat> selections modify expand by 1. Open “aspaper06” copy and paste as a new layer above 3 move the paper around until you like the placement of the dots, selections> invert hit delete. Selections> select none delete layer 3.
Open as64 copy and paste as a new layer (I hid the raster1 layer to make this easier to move) image>resize> 35% resample using weighted average lock the aspect ratio, adjust> sharpness> sharpen. Image> rotate> free rotate 35% right, move the ticket so it is in the top corner of the big circle (see my tag for placement).
Open as70 copy and paste as a new layer (keep raster 1 hidden) image>resize> 35% resample using weighted average lock the aspect ratio, adjust> sharpness> sharpen. Move the button so it is in the top corner of the little circle on the left (see my tag for placement).
Unhide raster 1 and make it active selections>select all> selections float> selections defloat> selections modify expand by 1. Open aspaper04 copy and paste as a new layer above raster 1 move the paper around until you like the placement of the paper, selections> invert hit delete. Selections> select none delete raster 1.
Open as67 copy and paste as a new layer image>resize> 35% resample using weighted average lock the aspect ratio, adjust> sharpness> sharpen. Move the lips so it is below the ticket in the big circle (see my tag for placement).
Open your tube copy and paste as a new layer. Move the tube so you like the placement. Make your big circle in the center the active layer selections>select all> selections float> selections defloat make your tube layer active. Use your magic wand to make the selection layer bigger to include the top of your tube, selections> invert hit delete. Selections> select none.
Open as68 copy and paste as a new layer image>resize> 35% resample using weighted average lock the aspect ratio, adjust> sharpness> sharpen. Move the lips so they are on top of your tubes thigh and looks good in the circle (see my tag for placement).
Open as71 copy and paste as a new layer image>resize> 35% resample using weighted average lock the aspect ratio, adjust> sharpness> sharpen. Move the button so it is in the bottom little dashed circle on the right (see my tag for placement)
Open as37 copy and paste as a new layer image>resize> 35% resample using weighted average lock the aspect ratio, adjust> sharpness> sharpen, Image>mirror. Move the tag so that the knot is “tying” the bottom stitched dot to the big circle then adjust the lips so that they look like the key is between them (see my tag for placement).
Add any other items you want from the kit to your tag. Add your © and your name. For the name I used the font Dreamspeak in black with no foreground. And for credits I used Pixelette.
Merge visible Congratulations you have finished another tag!!
If you need help with this tutorial please feel free to contact me at iceholecyn(at)gmail.com change the (at) to @ to make the email work =D
Feel free to show off what you have created with this tutorial at the same email address. Please comment if you used this tutorial I would love to know if this was helpful to anyone =D Thanks for trying my tutorial!
Subscribe to:
Post Comments (Atom)
Grab my Blinkie!

Facebook Badge
Stamps!!!
I did not make these but I do love them soo!!!
~
 ~
~
 ~
~
 ~
~
 ~
~
 ~
~
 ~
~
 ~
~
 ~
~
 ~
~
 ~
~
 ~
~
 ~
~
 ~
~
 ~
~
 ~
~
 ~
~
 ~
~
 ~
~
 ~
~
 ~
~
 ~
~
 ~
~
 ~
~
 ~
~
 ~
~
 ~
~
About Me

- Cindi
- I am married to my high school sweetheart. We have been together since 1994. We have one amazing little girl who makes everyday an adventure!
My girl Marsha's Tut site

0 comments:
Post a Comment