Showing posts with label Alika's Scraps. Show all posts
Showing posts with label Alika's Scraps. Show all posts
Monday, January 23, 2012
Tag from FTU kit Mishka In May by Alika's Scraps

You can get the Zlata M Tubes HERE
You can get Alika's FREE kit HERE
You can get the font I used "Papas Normal Swashes" HERE
I used a template from http://babesdesignz.blogspot.com but it seems to be gone keep checking maybe she will be back?
I covered her flowers with a few from the kit. Turned the doddle green and added a slight bevel to it. replaced all of the layers with the papers I liked and added the tube © and Alika.
Happy PSPing everyone!
Sunday, May 8, 2011
Kiss This
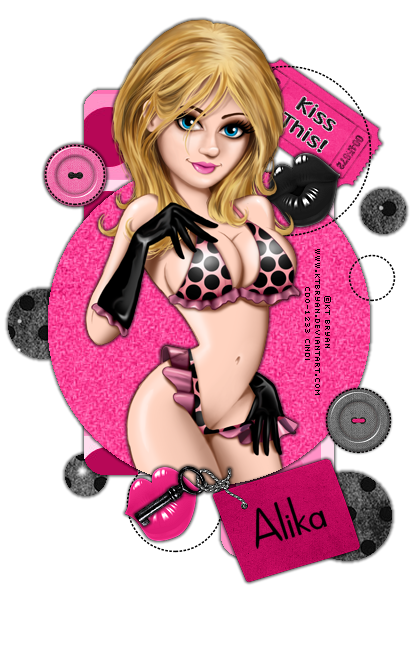
For this tag I used Paint Shop Pro 9 it should work with any version of the program.
You will need the “Kiss This” tagger scrap kit by Alika’s Designs. BabesDesignz_Template19.
You will also need a tube of choice I used beautiful artwork from KT Bryan. I also used eyecandy4000’s Gradient Glow (3, 45, 100, color black).
To start download the scrap kit unzip it, get your template unzip it and pick your tube.
Now open the template, Shift D to duplicate the template close the original. Save the duplicated template with whatever you want to call you tag.
We need to modify the template delete the “copyright” move the “2” layer above the “raster 1” layer. Image> rotate> rotate clockwise 90, flood fill your background with a really BRIGHT color (I like bright orange). We will delete this layer later but it is nice to be able to see the various elements we are adding.
Open as08 Copy and paste as a new layer just above your background. Image>rotate>free rotate> 90 degrees right. Make your background layer active selections>select all make the “as08’ layer active again selections> invert hit delete. Selections> select none.
Make 1 active selections>select all> selections float> selections defloat> selections modify expand by 1. Open “aspaper09” copy and paste as a new layer above 1 move the paper around until you like the placement of the dots, selections> invert hit delete. Selections> select none delete layer 1.
Make 3 active selections>select all> selections float> selections defloat> selections modify expand by 1. Open “aspaper06” copy and paste as a new layer above 3 move the paper around until you like the placement of the dots, selections> invert hit delete. Selections> select none delete layer 3.
Open as64 copy and paste as a new layer (I hid the raster1 layer to make this easier to move) image>resize> 35% resample using weighted average lock the aspect ratio, adjust> sharpness> sharpen. Image> rotate> free rotate 35% right, move the ticket so it is in the top corner of the big circle (see my tag for placement).
Open as70 copy and paste as a new layer (keep raster 1 hidden) image>resize> 35% resample using weighted average lock the aspect ratio, adjust> sharpness> sharpen. Move the button so it is in the top corner of the little circle on the left (see my tag for placement).
Unhide raster 1 and make it active selections>select all> selections float> selections defloat> selections modify expand by 1. Open aspaper04 copy and paste as a new layer above raster 1 move the paper around until you like the placement of the paper, selections> invert hit delete. Selections> select none delete raster 1.
Open as67 copy and paste as a new layer image>resize> 35% resample using weighted average lock the aspect ratio, adjust> sharpness> sharpen. Move the lips so it is below the ticket in the big circle (see my tag for placement).
Open your tube copy and paste as a new layer. Move the tube so you like the placement. Make your big circle in the center the active layer selections>select all> selections float> selections defloat make your tube layer active. Use your magic wand to make the selection layer bigger to include the top of your tube, selections> invert hit delete. Selections> select none.
Open as68 copy and paste as a new layer image>resize> 35% resample using weighted average lock the aspect ratio, adjust> sharpness> sharpen. Move the lips so they are on top of your tubes thigh and looks good in the circle (see my tag for placement).
Open as71 copy and paste as a new layer image>resize> 35% resample using weighted average lock the aspect ratio, adjust> sharpness> sharpen. Move the button so it is in the bottom little dashed circle on the right (see my tag for placement)
Open as37 copy and paste as a new layer image>resize> 35% resample using weighted average lock the aspect ratio, adjust> sharpness> sharpen, Image>mirror. Move the tag so that the knot is “tying” the bottom stitched dot to the big circle then adjust the lips so that they look like the key is between them (see my tag for placement).
Add any other items you want from the kit to your tag. Add your © and your name. For the name I used the font Dreamspeak in black with no foreground. And for credits I used Pixelette.
Merge visible Congratulations you have finished another tag!!
If you need help with this tutorial please feel free to contact me at iceholecyn(at)gmail.com change the (at) to @ to make the email work =D
Feel free to show off what you have created with this tutorial at the same email address. Please comment if you used this tutorial I would love to know if this was helpful to anyone =D Thanks for trying my tutorial!
Saturday, April 23, 2011
80’s Flashback

For this tag I used Paint Shop Pro 9 it should work with any version of the program.
You will need the “80’s Flashback” tagger scrap kit by Alika’s Designs.
You will also need a tube of choice I used beautiful artwork from FallnAngel. I also used eyecandy4000’s Gradient Glow (3, 25, 24, color white).
To start download the scrap kit unzip it, and pick your tube.
Now open paper02 it looks big don’t worry we will resize it later. Shift D to duplicate the paper close the original.
Copy and paste paper09 as a new layer; resize this layer uncheck lock the aspect ratio box make the width 100% and the height 60% center this layer. Selections>select all, selections> float, selections defloat keep selected.
Add a new raster layer Open the wire make paste it into your selection give the wire a glow. Resize your tag to 450 pixels make sure the lock aspect ratio box and the resize all layers box are both checked.
Add your tube put the feet on the edge of your middle layer.
Open the guitar02 paste as a new layer; Image rotate> free rotate 35 right. Place it so it looks like your tube is holding it. Use your freehand selection tool to cut away the part of the guitar that is covering your tubes hand. Give both your tube and the guitar a glow. Merge the tube and guitar together and move to the left of your tag.
Open wordart12 copy and paste as a new layer resize so it fits on the bottom right of your tag.
Add your © and your name. For the name I used the font TheNautiGal in bright green with no foreground. Then I did the same name in black shifted a little bit so you can see the green below.
Merge visible Congratulations you have finished another tag!!
If you need help with this tutorial please feel free to contact me at iceholecyn(at)gmail.com change the (at) to @ to make the email work =D
Feel free to show off what you have created with this tutorial at the same email address. Please comment if you used this tutorial I would love to know if this was helpful to anyone =D Thanks for trying my tutorial!
Thursday, February 10, 2011
Pink Tag tutorial (FTU scrap kit)
Here is my tutorial for the pink tag I made earlier this week. I was planning to write the tutorial right away but I forgot to save the template in layers and had to remake it from scratch. as a reminder this is the tag ♥

For this tag you will need Eye candy 4000,
Magical Creatures scrap kit by Alikas Scraps you can get it for free HERE
My template HERE
and tube of choice I used art from Jasmine Becket-Griffith you can get it HERE Please do not use the same tube with out proper license.
To start download the scrap kit, my template and pick your tube.
In PSP open my template, Shift+d to duplicate the template close the original template. Delete the first layer (my info) save the duplicated template with what ever you plan to call your completed tag. Auto save will only save your work IF you have save at least once before. This is your working template.
I like to start using templates from the bottom. so go to the bottom layer (the black layer) and right click to view current only. click the eye to view the layer called "Freehand591 BT" that is the name of the font I used for the word art circle. Use adjust> hue & saturation> Colorize to change the word art to a color from your tube.
From the scrap kit open pearls01. Copy and paste as a new layer just above your word art. Resize the pearls to fit inside the word art. (I used the full sized kit so I had to resize it to 15%) recolor the tube using the same settings you used for the word art.
Duplicate the pearl layer and then adjust> add remove noise> add noise> with random and Monochrome checked 26%. make your other pearl layer active and add noise 20%.
Click on the tag back layer and add a new rastor layer selections select all, From the kit open paper01 copy and paste into the selection. Make the tag active and selections float> selections defloat make the paper01 layer active and hit delete. selections > defloat and delete the gray tag back. color the paper 01 with the same settings you used before.
Make the next layer visible and active then repeat the steps above using paper9.
Make your frame for the box active and use eye candy with your favorite settings or use mine (9.3, 100, -4, 13, 50, 66, 66 color light pink) I saved my setting and called it light glass. Copy and paste your tube as a new layer move it below the frame and shift it to the right. then trim any of your tube sticking out of the frame by first making your frame layer active and using the magic wand on the outside of the frame. Selections> modify expand by 3 make the tube layer active and hit delete. now deselect. add your tube © between the pearls or someplace on the tag.
Make the flower layer active feel free to change it out for a flower from the kit. I used rose01 recolor and resized to make a little bundle. now is a good time to add more flowers next to your tube if you want to.
now we are to the fan layers. For all of the backgrounds I used paper03 (recolor like the other items) and all of the "frames" I used my eye candy light glass. Merging the fan blade frame to the fan blade background as I finished each one.
After you finish the nine fan blades make your next flower active make it match the flower layer you already have.
make the "name" layer active to add your name make sure you change the color to match your tube.
Now for the FUN part animation. (save again if you have not already)
right now ALL of your layers are active IF you want to make your tag with more then one name hide your name layer. Now scroll to the pearl layers and close the second set of pearls. Make your hand tool active and right click on your tag copy merged and paste into animation shop. back in PSP hide the pearl layer you have open and open the one you had hidden, hide the bottom fan blade it is #9. Copy merged and paste in your animation after the previous frame. Repeat these steps for frames 9 to frame 1.
when only frame one is left switch your pearl layers again and copy merged one more time. you now have 10 layers in ani shop. Select frames 1 to 9 and copy then paste as a new animation edit> select all. animation> reverse frames then copy those frames and paste into the original animation after frame 10. edit> select all and change the frame properties to 20. If you brought over the name you are done save the animation and send it to me to show off...
If not then edit select all and copy as a new animation layer. {this makes it so that when we undo we can never accidently remove any of the animations layers} (see note 1 below) Now take a trip back to your PSP program and click on your name layer view current only then copy merged and paste into animation shop as a new animation. Duplicate your name until you have 19 (or more) frames edit select all and copy. then make your tag animation active edit select all and paste into selected frames move your name so it is ON the top fan layer and view your animation to make sure you got the name on all of the layers if you did save and send it to me to show off... if you did not hit undo and try again. to add another name hit undo twice then repeat the steps to add your new name. You will have to hit undo twice because the first undo removes the animation compression the second undo removes the name.
*note 1: I like to go back into the PSP program and paste all of my animation layers as a new image at this point and then take a copy of my name layer(still as a changeable text vector layer) and add it as a new layer to the animation frames I copied over. I close my previous working file and save my animation shop layers with the same name as I used for my working file. this helps save steps if I decide to add more names later so I don't have to redo the whole reanimation of the tag.
If you need help with this tutorial please feel free to contact me at iceholecyn(at)gmail.com change the (at) to @ to make the email work =D
feel free to show off what you have created with this tutorial at the same email address. Please comment if you used this tutorial or snagged the template I would love to know if this was helpful to anyone =D Thanks for trying my tutorial!

For this tag you will need Eye candy 4000,
Magical Creatures scrap kit by Alikas Scraps you can get it for free HERE
My template HERE
and tube of choice I used art from Jasmine Becket-Griffith you can get it HERE Please do not use the same tube with out proper license.
To start download the scrap kit, my template and pick your tube.
In PSP open my template, Shift+d to duplicate the template close the original template. Delete the first layer (my info) save the duplicated template with what ever you plan to call your completed tag. Auto save will only save your work IF you have save at least once before. This is your working template.
I like to start using templates from the bottom. so go to the bottom layer (the black layer) and right click to view current only. click the eye to view the layer called "Freehand591 BT" that is the name of the font I used for the word art circle. Use adjust> hue & saturation> Colorize to change the word art to a color from your tube.
From the scrap kit open pearls01. Copy and paste as a new layer just above your word art. Resize the pearls to fit inside the word art. (I used the full sized kit so I had to resize it to 15%) recolor the tube using the same settings you used for the word art.
Duplicate the pearl layer and then adjust> add remove noise> add noise> with random and Monochrome checked 26%. make your other pearl layer active and add noise 20%.
Click on the tag back layer and add a new rastor layer selections select all, From the kit open paper01 copy and paste into the selection. Make the tag active and selections float> selections defloat make the paper01 layer active and hit delete. selections > defloat and delete the gray tag back. color the paper 01 with the same settings you used before.
Make the next layer visible and active then repeat the steps above using paper9.
Make your frame for the box active and use eye candy with your favorite settings or use mine (9.3, 100, -4, 13, 50, 66, 66 color light pink) I saved my setting and called it light glass. Copy and paste your tube as a new layer move it below the frame and shift it to the right. then trim any of your tube sticking out of the frame by first making your frame layer active and using the magic wand on the outside of the frame. Selections> modify expand by 3 make the tube layer active and hit delete. now deselect. add your tube © between the pearls or someplace on the tag.
Make the flower layer active feel free to change it out for a flower from the kit. I used rose01 recolor and resized to make a little bundle. now is a good time to add more flowers next to your tube if you want to.
now we are to the fan layers. For all of the backgrounds I used paper03 (recolor like the other items) and all of the "frames" I used my eye candy light glass. Merging the fan blade frame to the fan blade background as I finished each one.
After you finish the nine fan blades make your next flower active make it match the flower layer you already have.
make the "name" layer active to add your name make sure you change the color to match your tube.
Now for the FUN part animation. (save again if you have not already)
right now ALL of your layers are active IF you want to make your tag with more then one name hide your name layer. Now scroll to the pearl layers and close the second set of pearls. Make your hand tool active and right click on your tag copy merged and paste into animation shop. back in PSP hide the pearl layer you have open and open the one you had hidden, hide the bottom fan blade it is #9. Copy merged and paste in your animation after the previous frame. Repeat these steps for frames 9 to frame 1.
when only frame one is left switch your pearl layers again and copy merged one more time. you now have 10 layers in ani shop. Select frames 1 to 9 and copy then paste as a new animation edit> select all. animation> reverse frames then copy those frames and paste into the original animation after frame 10. edit> select all and change the frame properties to 20. If you brought over the name you are done save the animation and send it to me to show off...
If not then edit select all and copy as a new animation layer. {this makes it so that when we undo we can never accidently remove any of the animations layers} (see note 1 below) Now take a trip back to your PSP program and click on your name layer view current only then copy merged and paste into animation shop as a new animation. Duplicate your name until you have 19 (or more) frames edit select all and copy. then make your tag animation active edit select all and paste into selected frames move your name so it is ON the top fan layer and view your animation to make sure you got the name on all of the layers if you did save and send it to me to show off... if you did not hit undo and try again. to add another name hit undo twice then repeat the steps to add your new name. You will have to hit undo twice because the first undo removes the animation compression the second undo removes the name.
*note 1: I like to go back into the PSP program and paste all of my animation layers as a new image at this point and then take a copy of my name layer(still as a changeable text vector layer) and add it as a new layer to the animation frames I copied over. I close my previous working file and save my animation shop layers with the same name as I used for my working file. this helps save steps if I decide to add more names later so I don't have to redo the whole reanimation of the tag.
If you need help with this tutorial please feel free to contact me at iceholecyn(at)gmail.com change the (at) to @ to make the email work =D
feel free to show off what you have created with this tutorial at the same email address. Please comment if you used this tutorial or snagged the template I would love to know if this was helpful to anyone =D Thanks for trying my tutorial!
Monday, February 7, 2011
Tag I just made...
I think I will tut this tomorrow... I made it tonight as an entry to Sweet Intentions 1st Challenge. HERE
The scrap kit I used was Magical Creatures by Alikas Scraps you can get it for free HERE I recolored the items to match my tube a bit better but I love those papers ♥
This Tag features Jasmine Becket-Griffith you can get it HERE.
The scrap kit I used was Magical Creatures by Alikas Scraps you can get it for free HERE I recolored the items to match my tube a bit better but I love those papers ♥
This Tag features Jasmine Becket-Griffith you can get it HERE.
Subscribe to:
Posts (Atom)
Grab my Blinkie!

Facebook Badge

Stamps!!!
I did not make these but I do love them soo!!!
~
 ~
 ~
 ~
 ~
 ~
 ~
 ~
 ~
 ~
 ~
 ~
 ~
 ~
 ~
 ~
 ~
 ~
 ~
 ~
 ~
 ~
 ~
 ~
 ~
 ~
 ~
About Me
- Cindi
- I am married to my high school sweetheart. We have been together since 1994. We have one amazing little girl who makes everyday an adventure!
My girl Marsha's Tut site
