Showing posts with label Pinup Toons. Show all posts
Showing posts with label Pinup Toons. Show all posts
Thursday, August 7, 2014
Playing with effects to make tags
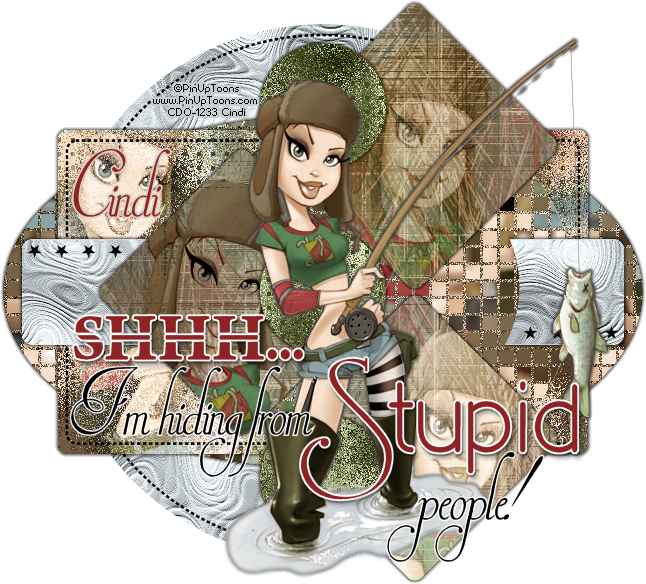
First I snagged Dee's awesome template "Stupid People Template" HERE.
Then pick your tube I used PinUp Toons Individual Tube 161-2 You can get it HERE. This tube has two versions one larger than the other.
Shift+D to duplicate your template. Then I rearranged some layers Delete the info layer. I didn't have any of the fonts that Dee used to make the template so I changed the "I'm hiding from" and the "people" to the font I decided to use for the name. I used "Invitation Script LIMITED FREE" HERE.
Merge the Top, middle and bottom diagonal squares, Merge the Top green circle, middle green circle, bottom green circle.
I deleted the dotted circle just above the aqua circle. then moved the aqua circle below the top diagonal square then the creme strip back below the aqua circle. Delete green circle (it is a pale green), Delete the BG layer.
Now to make some papers...
Take the larger tube and copy it as a new layer on the template.
Then use MuRa's Meister copies you can get it HERE I used the wallpaper setting to make it into a full sheet; I did it twice to get rid of any holes the first run left behind. Duplicate this until you have 4 sheets,
Turn the sheets pretty with...
Use Mosaic - Antique with these settings on 1

Use Mosaic - Glass with these settings on another.

Use Fur with these settings on another.

Use Soft plastic with these settings on another.

After I did the soft plastic I changed the color to a blue grey to make it look more like the water that came with the tube.
Use your newly created "papers" to decorate your template. Duplicate the type of paper you want to use then put it just above the "shape" layer you want to use it for. For most of the layers I delete the original layer after I get the shape cut out of the paper. To get the shape go to the shape layer selection- select all- selections float- selections defloat then make the active layer the paper selections invert then hit delete. After that I delete the original layer.
I used the Mosaic Antique on layers the green oval, white circle, aqua circle
I used the Mosaic Glass on layers on the three merged circles (for this one I did not delete the original layer instead I changed the blend mode until I got a green I liked), and the aqua rectangle.
I used Fur on the three merged diagonal squares.
I used Soft plastic on the creme circle, and the creme strip.
Use 4 copies of the large tube to decorate the various layers, with blend modes I used Screen, luminance legacy, soft light, and multiply on different layers. You can use what ever looks best to you.
Then I used the smaller tube in the middle of the tag.
Add your favorite drop shadow to the top tube and any layers you want to POP.
add your copyright info and name.
Merge visible Congratulations you have finished another tag!!
If you need help with this tutorial please feel free to contact me at iceholecyn(at)gmail.com change the (at) to @ to make the email work =D Feel free to show off what you have created with this tutorial at the same email address. Please comment if you used this tutorial I would love to know if this was helpful to anyone =D Thanks for trying my tutorial!
Sunday, March 6, 2011
Room Tag Tutorial (PTU scrap kit)

For this tag I used Paint Shop Pro X3 it should work with any version of the program.
You will need the “Dark Angel” tagger scrap kit by Wicked Princess you can get it from Scrappetizing HERE, Twilight Scraps HERE, or Lollipops N Gumdrops HERE Look at all three there might be a sale.
You will also need a tube of choice I used Pinup Toons you can get them HERE Please do not use the same tubes without proper license.
To start download the scrap kit unzip it, and pick your tube.
In PSP open WP_DA_ PP16 Shift+d to duplicate the paper close the original. Save the duplicated paper with what ever you plan to call your completed tag. Auto save will only save your work IF you have save at least once before. Open WP_DA_Chair copy and paste as a new layer on your tag; Image mirror to make the chair face the other way. Copy and paste your “Slave” Pinup Toon and place her on the chair so it looks like she is lounging see my tag for reference; she fits in the chair without resizing. Once you have her on the chair merge the two layers together rename this layer chair. Then move the chair so that her shoe is almost to the left wall keeping the legs of the chair on the floor.
Open the WP_DA_ Piano Stool and copy and paste it as a new layer on to your tag. Move this layer below the chair layer. Image resize 80% make sure the Resample using Weighted Average IS checked. Lock the aspect ratio IS chacked and the Resize all layers box is NOT checked. Move the stool so it looks like a table next to the chair. I did not like the color so I changed it, Adjust>Hue& Saturation>Colorized with H128, S255. When I was happy with the placement of the table next to the chair I hid the chair to make decorating the table easier. I decorated the table using WP_DA_RoseCandle image resize 35% anytime I resize an image I like to adjust>sharpness>sharpen. Next I took the WP_DA_Goblet and copy and pasted as a new layer then resized 25% sharpen it. Then duplicate it and move the glasses so they are next to each other. Unhide the chair layer to make sure the placement of the items on the table still look nice. If you are happy with the table placement hide the chair and the background layer. Then merge visible and rename this layer table. (You should now have 3 layers from the bottom you should have the background, table, chair) Hide the chair and the table layers. Save if you have not already.
Open WP_DA_Arch Copy and paste as a new layer above the background layer. Position the Arch so it is on the left just touching the floor and almost touching the left edge. Duplicate the arch and Image> mirror so you have two arches merge the two arches down so they are a part of the background. Between the two arches I placed two of the WP_DA_KnotHeart resized to 30% and then merged those down too. Promote the background to a layer and rename the layer room.
Using your magic wand with tolerance set at 10 select inside the frame area of the windows so we can cut those out. Open WP_DA_Pinetree copy and paste place somewhere in the window then duplicate and place a tree in the other window. Open WP_DA_Gate resize 30% and place so it is at the top of one of the windows move the room layer above the trees and the gate. Move the trees and the gate around until you are happy with the placement of the items outside the windows. Close the room layer. Open WA_DA_PP12 copy and paste as a new layer put this layer below the trees and gate. Merge visible rename the layer outside. Save if you have not already.
Add any other elements from the kit you want to when you are happy with the placements Merge visible. Resize the tag to 450 pixels wide making sure the resize all layers box IS checked this time; sharpen. Add the copyright information for the tube you used and your name. Congratulations you have finished another tag!!
If you need help with this tutorial please feel free to contact me at iceholecyn(at)gmail.com change the (at) to @ to make the email work =D
Feel free to show off what you have created with this tutorial at the same email address. Please comment if you used this tutorial I would love to know if this was helpful to anyone =D Thanks for trying my tutorial!
Subscribe to:
Posts (Atom)
Grab my Blinkie!

Facebook Badge

Stamps!!!
I did not make these but I do love them soo!!!
~
 ~
~
 ~
~
 ~
~
 ~
~
 ~
~
 ~
~
 ~
~
 ~
~
 ~
~
 ~
~
 ~
~
 ~
~
 ~
~
 ~
~
 ~
~
 ~
~
 ~
~
 ~
~
 ~
~
 ~
~
 ~
~
 ~
~
 ~
~
 ~
~
 ~
~
 ~
~
About Me
- Cindi
- I am married to my high school sweetheart. We have been together since 1994. We have one amazing little girl who makes everyday an adventure!
My girl Marsha's Tut site
