Saturday, March 19, 2011
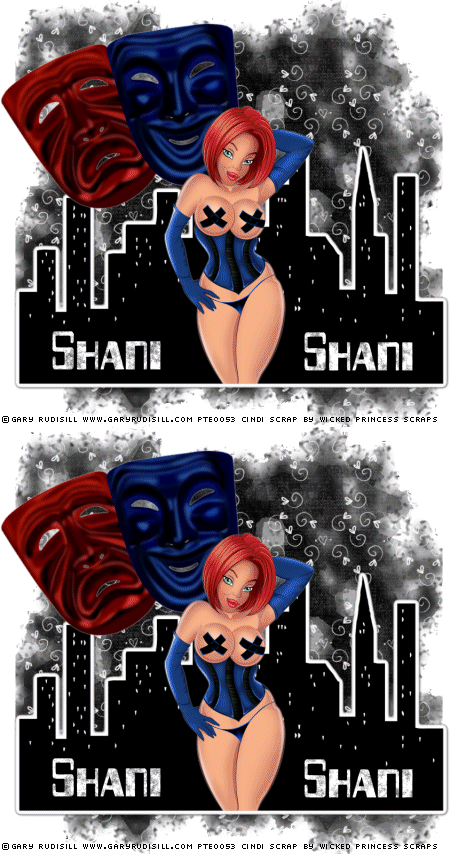
Darling Nikki Tag Tutorial (PTU scrap kit)
For this tag I used Paint Shop Pro 9 it should work with any version of the program.
You will need the “Darling Nikki” tagger scrap kit by Wicked Princess Scraps you can get it exclusively from Designer Scraps.
You will also need a tube of choice I used Gary Rudisill 's beautiful artwork Please do not use the same tubes without proper license. I used WEESCOTSLASS’ mask WSL-228 she has a list of zipfiles just below her intro on the right of the page if you need it. I also used Eyecandy4000's HSB Noise.
To start download the scrap kit unzip it, put you mask in your masks folder, and pick your tube.
Now open a new image 900x900 don’t worry we will resize it later. Flood fill this layer with white then apply your mask with the Invert transparency box CHECKED. Merge the group and duplicate the layer. On both of the groups use Eyecandy4000 HSB noise with the settings 100,100,100,100,7.62,7.62 smooth lumps seamless tile Unchecked hit random a few times. Name one of the layers 1 and the other 2. {If you are not going to animate then you can skip the second layer.} Use your layer link toggle and make both of them 1.
Open paper WP_DN_PP6 and copy/paste it as a new layer. Apply your mask to this layer but Uncheck the invert transparency box merge group. Take your magic wand and click the outer edge area of the group you just made make your layer 1 active and hit delete and then do the same to layer two. Make this layer linked with the mask layers. Then hide the layer 1 and layer 2 we will not need them again for a while.
Open the element WP_DN_CITYSCAPE resize 70% merge all Unchecked. Move the city so it is just above the mask on the bottom and fits nicely side to side of the mask. When you are happy with the placement link this layer with the others.
Open WP_DN_TRAGEDYMASK image>rotate> free rotate 10 left and then open WP_DN_COMEDYMASK image>rotate> free rotate 10 right use the move tool to position the masks close together then merge them together. Image>rotate>free rotate 20 left. Then resize 60% and sharpen. Give your tube a drop shadow I used 0,0,100,2 white. Move them so they are to the left of the tag. When you are happy with the placement link this with the other layers.
Open your tube and place it so its head is aligned with the smile of the comedy mask or just slightly below. Now take your selections tool and cut off the bottom of your tube just above the white edge of the city. Give your tube the same drop shadow as before.
Now is a good time to add any extra elements you want. When you are happy with your placements merge visible (make sure your layer 1 & 2 are still hidden). Duplicate this layer merge the original with layer 1 and the other with layer 2.
To cut the image down go to image canvas size uncheck the lock aspect ratio box then make the canvas 843x800 centered. Make sure the image is really centered; when you are sure it is resize to 450 pixels resize all layers box checked. Sharpen both of your frames. Add a white background to both layers by adding a new layer flood fill it with white and then merging the layers down.
Add your © and your name.
For the name I used the font 256 Bytes in white with no foreground. When you have your name placed the way you like it selections> select all> float then use your eyecandy4000 with the same settings as before selections select none.
IF you are not animating save and you are done. If you are animating open your animation shop then copy merged and paste into animation shop, go back to psp9 and hit undo until you just have the name layer floating then use eyecandy4000 but hit random a few times and then selections select none. Hide the top layer with the tube and then copy merged into animation shop after the frame that is already there. Save with your favorite settings. Congrats you have finished another tag!!
If you need help with this tutorial please feel free to contact me at iceholecyn(at)gmail.com change the (at) to @ to make the email work =D
Feel free to show off what you have created with this tutorial at the same email address. Please comment if you used this tutorial I would love to know if this was helpful to anyone =D Thanks for trying my tutorial!
Labels:
Black,
Blue,
Gary Rudisill,
Red,
tags,
tutorial,
Wicked Princess
Subscribe to:
Post Comments (Atom)
About Me

- Cindi
- I am married to my high school sweetheart. We have been together since 1994. We have one amazing little girl who makes everyday an adventure!
Labels
- Alika's Scraps (5)
- Ann (2)
- Avi (1)
- Black (7)
- Blue (4)
- Brown (3)
- Christmas (1)
- Creative Intentionz (1)
- Creatively Scrappin Blog Train (2)
- CU (2)
- Cuddly Rigor Mortis (1)
- Daniel Esparza (1)
- Dee'sSign Depot Dangerously Delicious Designz (1)
- Fabulous Art Beginnings (1)
- FallnAngel (2)
- Freebie (1)
- Gary Rudisill (1)
- Green (6)
- Jasmine Becket-Griffith (3)
- KT Bryan (1)
- Lady Mishka (1)
- Lollipops n Gumdrops (2)
- Myka Jelina (2)
- O'Scrap Candy Shack (1)
- Orange (2)
- Owl (1)
- Pink (8)
- Pinup Toons (2)
- Purple (3)
- Red (3)
- Sale (1)
- Steampunk (2)
- Suzanne Woolcott (1)
- tags (14)
- template (2)
- ThePSProject (1)
- tutorial (13)
- Weescotslass Creations (1)
- Wicked Princess (4)
- Zlata M (1)
Followers
T.O.U.
OK so for now I am going to keep it simple.
Please email me if you have any questions regarding usage which is not answered. Contact: iceholecyn@gmail.com
If you want a tag or stat I have displayed PLEASE contact me I save most of my templates.
If you want to share my work with your friends and family, send them a link to my blog so they can download for themselves.Just copy and paste my URL http://iceholecyn.blogspot.com/
You MAY NOT:* Claim my work as your own.* Alter any of my work and claim as your own original creation.* Upload my work to any website or file hosting site as downloads.
My CU items simply require a credit as a part of your kit. IF you are feeling generous you can send me a free copy of your kit :D
Thank you!
Cindi aka IceHoleCyn


0 comments:
Post a Comment